UnlockedFIRE.tv Setup Guide


This guide will take you through the process of getting your device setup and ready to make the most of your UnlockedFIRE service.
The guide is broken up into several different guides, which will guide you through setting up the applications you need to download the relevant files, downloading and installing the recommended media players, and finally, downloading and setting up the players (which you will use to access your subscriptions).
If you have already completed one or more of these steps, then you can jump to the appropriate guide by clicking the relevant links to the right.
If you’re just getting started, then start with the “Downloading the Downloader App” guide and work your way through this entire setup guide.

Downloading the Downloader App
1. From the Device’s Main Menu scroll to hover over Settings

2. Click My Fire TV

3. Choose Developer Options

4. Click Apps from Unknown Sources

5. Choose Turn On
NOTE: Turning on Unknown Sources is not needed to install Downloader. However, to install any 3rd party applications via Downloader, this must be enabled.

6. Return to the home screen and hover over the Search icon

7. Type in Downloader

8. Select the Downloader app

9. Click Download

10. Click Open

11. Click Allow

12. Click OK

That’s it! Downloader is now installed.

Installing Wuffy Player
1. Open the Downloader App from your Apps dashboard
2. Now, click on the URL tab using the OK/Select key on your FireStick remote

3. Type the following URL to download Wuffy Player: unlockedfire.co/apk2 and then click “Go”.

Scroll down the list and select “WuffyPlayer”

4. Wuffy Player will now start to download.

5. Next, click on Install

6. Give it some time until the app is installed on your device

7. You will see a notification when the Wuffy Player is installed on FireStick. Click on the “Open” button.

8. Click “Accept” to accept the terms and conditions

9. Check the box “Do not show again” and click “Skip”.

10. Scroll over to the “Settings” tab and select it, then scroll down the page to the “Visual Experience” section and check the box for “Click once to exit”.

11. Scroll down to the “Auto HLS Bandwidth” section, and move the two sliders for Wi-Fi and Mobile across to “13 MB/s”.

12. Press he back button on your remote to exit, and when the popup appears, check the box for “Do not show again”, then click “No, thanks, quit” to exit the app.

Wuffy Player is now installed and configured, you can set it as the default player in whichever app you use to stream (TiviMate, IPTV Smarters etc).

Installing MX Player Pro
1. Open the Downloader app from your device’s home screen
2. Type the following address and then click Go to install MX Player – unlockedfire.co/apk2
Scroll down the list and select “MX Player Pro”

3. Click Install

4. Click Done

5. Click Delete

6. Click Delete Again

7. Open MX Player and click “Allow”, then select the three dots in the top right hand corner of the page, and then click on “Settings”

8. Select “Decoder”, and then check the top two boxes for “HW+ decoder”.

Click the back button or home button to exit the app, MX Player is now installed and configured, ready for use with your streaming service.
MX Player is now installed on your streaming device!

Installing VLC Player
1: Open Firestick Home

2: Navigate to Search option available at the top menu

3: Now you need to type ‘VLC’ and click on the first result that appears

4: Click on the VLC for Fire TV app you see in this image

5: Click on the Download or Get button that appears

6: Once the installation ends, select Open

7: Once the app is opened, it will look something like this

8: Feel free to play any media file on it and start streaming!


Installing TiviMate
Step-by-Step Instructions
1. Open the Downloader app from your device’s home screen.

2. Type the following URL exactly as shown here: https://aftv.news/13509 and click Go.

3. Wait for file to download.

4. Click Install.

5. Click Done.

6. This will take you back to Downloader. Click Delete.

7. Click Delete again.

8. Return to device home-screen and under “Your Apps & Channels” click See All.

9. Scroll down to hover over TiviMate.

10. Click Menu button on remote (3 horizontal lines), then click Move to Front.

App installation is now complete! Now you need to connect your UnlockedFIRE subscriptions.
1. Open TiviMate App and click Add Playlist

2. Click Xtream Codes login

3. Enter the server URL for your subscription, for UnlockedFIRE PREMIUM this will be https://ufprem.xyz:24561 , for UnlockedFIRE PRIME http://ufpri.me , and for UnlockedFIRE Flix ‘n’Chill http://couchguy.club, then enter your username and password and click next.
4. Wait for Channels to insert.

6. You will then see Playlist is processed message with Channel count and your Playlist name. Click Next.

7. Now you can click Next/Finish and start watching.

It is important to note that many of the features within TiviMate are not available for those who choose to use the free service.
For example, if you try adding a channel or channels to favorites you will be prompted with the following message:

For those who wish to use the free version, simply click Cancel and continue with the TiviMate App.
If you purchase the premium option through the TiviMate Companion app, we can login for added benefits.
If you need to create an account, you can follow instructions below on how to do that through Google Play Store.
TiviMate premium costs only $4.99/yr for 5 devices and that includes a 5 day free trial.
Prior to installing TiviMate Premium, users must register for an Account via the TiviMate Companion App. This app is only available in the Google Play Store, therefore must be installed on Android Device or through BlueStacks or another Android emulator.
If you do not have an Android phone or device, you must install the BlueStacks emulator on your PC to access the Google Play Store.
Once installed, use the instructions below to setup a TiviMate Account.
1. Open the Google Play Store on your Android Device. We are using Bluestacks in this tutorial on my Windows PC. Search for “tivimate companion” and select the first choice.

2. Click Install.

3. Wait for download to finish.

4. Click Open.

5. Click Account.

6. Enter a username and password that you would like to use and select Create Account.

7. Click Buy Subscription and enter your payment information.

8. Registration is complete!

Be sure to write down or remember your login information to sign into the TiviMate App.
Login to TiviMate
To access the login page, simply add a Channel to Favorites by clicking the Menu button on your remote (3 Horizontal lines) and choose Add to Favorites as shown below. You may also long press the OK or Select button on your remote to gain access to these various options.

Click Next.
Choose Account.

Enter your Credentials and click Log in.

Enter device name and click Activate.

Click OK.

That’s it! Once logged in, you will have access to all premium features of the app for an enjoyable live streaming experience.
The next step is to configure the Tivimate for optimum performance…
Open TiviMate and hold down on the enter button (inside the circle on a firestick remote) – hold down on any channel to get the settings menu to pop up on the right side and then scroll down to settings

Scroll to “General” on the settings menu, and then – TOGGLE ON THE TWO LINES THAT SAY “TURN ON LAST CHANNEL ON APP START” and ” “confirm exit by second press back”

Then press the back button on the remote and go down to EPG, then make the following edits:
– set the “Past Days to Keep to keep EPG” to “2”
– set the “update internal hours” to “2 hours”
– then turn on the two buttons for “update on app start” and “update on playlists changes”

Press back button on the remote and click on “Appearance”” – and scroll down down to “TV Guide” and turn on “Highlight Current Programs”

Press back and scroll down to “Player” then turn the “transparent clock on if you like having a clock on – recommend setting to small, placed in top right, with the transparency high so you barely notice it unless you need to know the time

Press the back button and scroll down to set the language to your preferred language – the app will restart so repeat the steps that will get you back to the “Appearance” screen.
Set the Font size (under the “Appearance menu”) based on your preference

Set your transparency (under the appearance menu) to high if you like the affect of this feature in your TV Guide while watching

Press the back button and scroll down to “About” then scroll down to “Check for new version” usually at first setup, there will be an update. The app will auto update after your initial setup

The last thing you may want to do is turn off / hide certain channel groups and categories which you won’t use, such as Latino channels, or any other channel group which is not relevant for you.
To do this, open the settings menu and select “Playlists” from the menu.

Select the playlist you wish to edit (if you have UnlockedFire Premium and UnlockedFIRE Prime, then you will have to do this for both playlists).

Scroll down to “Manage Groups”

Scroll down the list of groups and click the ok/select button on your Firestick remote to turn the toggle from on (blue) to off (grey). Repeat this for every group you wish to turn off/hide, and then press the back button to save.

Your TiviMate is now setup, fully configured and ready to use!
Step-by-Step Instructions
1. Open the Downloader app from your device’s home screen.
2. Type the following URL exactly as shown here: unlockedfire.co/tivi and click Go.

3. Wait for file to download.
4. Click Install.
5. Click Done.
6. This will take you back to Downloader. Click Delete.
7. Click Delete again.
8. Return to device home-screen and under “Your Apps & Channels” click See All.
9. Scroll down to hover over TiviMate.
10. Click Menu button on remote (3 horizontal lines), then click Move to Front.
App installation is now complete! Now you need to connect your UnlockedFIRE subscriptions.
1. Open TiviMate App and click Add Playlist
2. Click Xtream Codes login
3. Enter the server URL for your subscription, for UnlockedFIRE PREMIUM this will be https://ufprem.com:24561 , and for UnlockedFIRE PRIME http://ufprime.com, then enter your username and password and click next.
4. Wait for Channels to insert.
6. You will then see Playlist is processed message with Channel count and your Playlist name. Click Next.
7. Now you can click Next/Finish and start watching.
It is important to note that many of the features within TiviMate are not available for those who choose to use the free service.
For example, if you try adding a channel or channels to favorites you will be prompted with the following message:
For those who wish to use the free version, simply click Cancel and continue with the TiviMate App.
If you purchase the premium option through the TiviMate Companion app, we can login for added benefits.
If you need to create an account, you can follow instructions below on how to do that through Google Play Store.
TiviMate premium costs only $4.99/yr for 5 devices and that includes a 5 day free trial.
Prior to installing TiviMate Premium, users must register for an Account via the TiviMate Companion App. This app is only available in the Google Play Store, therefore must be installed on Android Device or through BlueStacks or another Android emulator.
If you do not have an Android phone or device, you must install the BlueStacks emulator on your PC to access the Google Play Store.
Once installed, use the instructions below to setup a TiviMate Account.
1. Open the Google Play Store on your Android Device. We are using Bluestacks in this tutorial on my Windows PC. Search for “tivimate companion” and select the first choice.
2. Click Install.
3. Wait for download to finish.
4. Click Open.
5. Click Account.
6. Enter a username and password that you would like to use and select Create Account.
7. Click Buy Subscription and enter your payment information.
8. Registration is complete!
Be sure to write down or remember your login information to sign into the TiviMate App.
Login to TiviMate
To access the login page, simply add a Channel to Favorites by clicking the Menu button on your remote (3 Horizontal lines) and choose Add to Favorites as shown below. You may also long press the OK or Select button on your remote to gain access to these various options.
Click Next.
Choose Account.
Enter your Credentials and click Log in.
Enter device name and click Activate.
Click OK.
That’s it! Once logged in, you will have access to all premium features of the app for an enjoyable live streaming experience.
The next step is to configure the Tivimate for optimum performance…
Open TiviMate and hold down on the enter button (inside the circle on a firestick remote) – hold down on any channel to get the settings menu to pop up on the right side and then scroll down to settings
Scroll to “General” on the settings menu, and then – TOGGLE ON THE TWO LINES THAT SAY “TURN ON LAST CHANNEL ON APP START” and ” “confirm exit by second press back”
Then press the back button on the remote and go down to EPG, then make the following edits:
– set the “Past Days to Keep to keep EPG” to “2”
– set the “update internal hours” to “2 hours”
– then turn on the two buttons for “update on app start” and “update on playlists changes”
Press back button on the remote and click on “Appearance”” – and scroll down down to “TV Guide” and turn on “Highlight Current Programs”
Press back and scroll down to “Player” then turn the “transparent clock on if you like having a clock on – recommend setting to small, placed in top right, with the transparency high so you barely notice it unless you need to know the time
Press the back button and scroll down to set the language to your preferred language – the app will restart so repeat the steps that will get you back to the “Appearance” screen.
Set the Font size (under the “Appearance menu”) based on your preference
Set your transparency (under the appearance menu) to high if you like the affect of this feature in your TV Guide while watching
Press the back button and scroll down to “About” then scroll down to “Check for new version” usually at first setup, there will be an update. The app will auto update after your initial setup
The last thing you may want to do is turn off / hide certain channel groups and categories which you won’t use, such as Latino channels, or any other channel group which is not relevant for you.
To do this, open the settings menu and select “Playlists” from the menu.
Select the playlist you wish to edit (if you have UnlockedFire Premium and UnlockedFIRE Prime, then you will have to do this for both playlists).
Scroll down to “Manage Groups”
Scroll down the list of groups and click the ok/select button on your Firestick remote to turn the toggle from on (blue) to off (grey). Repeat this for every group you wish to turn off/hide, and then press the back button to save.
Your TiviMate is now setup, fully configured and ready to use!

Installing IPTV Smarters Pro
1. Open the Downloader app
2. Type the following URL exactly as shown here: unlockedfire.co/smarters and click Go.

3. Wait for file to download.

4. Click Install.

5. Click Done.

6. This will take you back to Downloader. Click Delete.
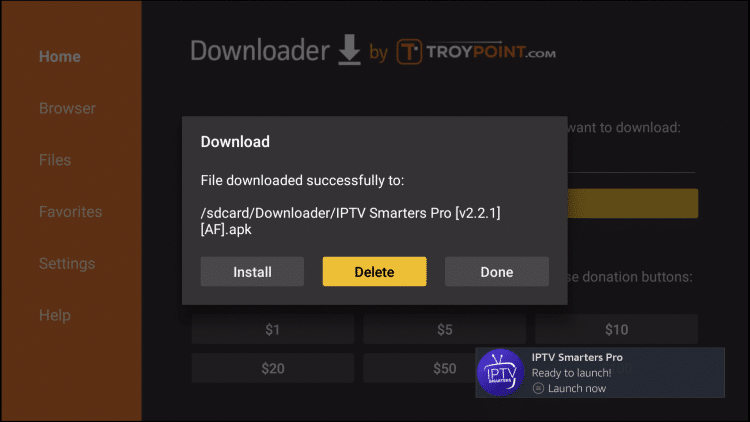
7. Click Delete again.

8. Return to device home-screen and under “Your Apps & Channels” click See All.
9. Scroll down to hover over IPTV Smarters.

10. Click Menu button on remote (3 horizontal lines), then click Move to Front.

App installation is now complete!
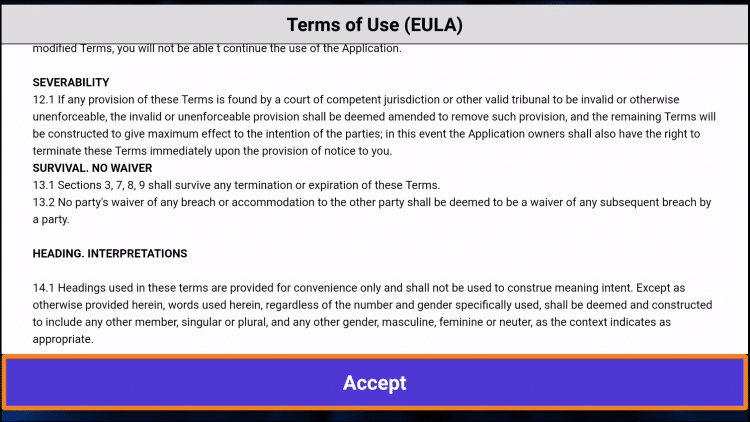
IPTV Smarters Setup
After opening, you will see the “Terms of Use” agreement.
Click Accept
Click Add New User

Choose login with Xtream Codes API

Enter the server URL for your subscription, for UnlockedFIRE PREMIUM this will be https://ufprem.xyz:24561 , for UnlockedFIRE PRIME http://ufpri.me , and for UnlockedFIRE Flix ‘n’Chill http://couchguy.club, then enter your username and password and click next.

Wait for User added successfully message to appear

Click your Profile and enjoy!

Open the settings tab by clicking the clog wheel in the top right corner of the page and then click “General Settings”

Uncheck the option for “AutoStart on Bootup”

Go to “Time Format”, change to “12 Hour” and then save.

Go to “Player Settings” and change to “Hardware Decoder” and then click “Save”.

Go to “Player Selection” and select “Wuffy Player” for best performance, or “MX Player” for better performance. (You may need to install the players first if you do not already have them installed, you can find the instructions on this page for installing both Wuffy and MX Player).
We recommend setting the player selection as shown in the screenshot below, with all set to use “Wuffy Player” with the exception of Movies where you should use “MX Player Pro”.

Go to “Parental Lock” and enter a pin to lock/hide any categories (Adult) which you do not want to appear in your EPG / Channel Selection.

The IPTV Smarters app is now fully configured and optimised for performance – enjoy!
FAQs, Troubleshooting, and Useful Resources
A Restart of your Router and Device solves 90% of Issues!
Before proceeding to troubleshoot any issues, please perform a restart on your equipment.
Power off your router, pull the plug for 5 min and power on again. This will clear the cache from your router. Then turn your TV box or Smart TV off, pull the plug for 5 minutes and turn and back on. This will clear out all the old cache settings from your router and device and should provide a fresh connection.
This is often the solution to a lot of problems and is essential before other troubleshooting can begin.
Using our Android App:
The most common issue here is people using the default Player, The best thing to do is change External player to VLC (on a firestick or similar you will need to sideload it)
Launch the app>login>click Live TV>click the three dots in the top right corner>click settings>change the default media player from Default to VLC. Unless you are on a firestick when you launch a channel you will be prompted to get VLC from the playstore.
Another Setting if the app supports it is changing Default decoder to Hardware or HW+
The most common cause of buffering is the result of slow internet connection. This may be because of low internet speed or other users hogging the bandwidth in your house. Do you have lots of users in your home? Disconnect them all and try again
The second and more logical reason is that you are using Wi-Fi, it doesn’t matter how fast your internet is…Wi-Fi as whole is slow and unreliable. it just is…. You should avoid using it when possible
Resolution:
Directly connect to your router using an ethernet cable or to a powerline adaptor.
If not possible, try moving the box closer to the router.
Change your WI-FI channel. To avoid interference with nearby devices.